1. Overview
This portfolio summarises my contributions made throughout the project.
ClinicIO is a project from CS2103T intended for students to learn Software Engineering at an entry-level.
ClinicIO is a clinic management desktop application that allows receptionists to manage a clinic with ease and efficiency. ClinicIO can be used to manage patient records, queues, medical inventory, appointments as well as view detailed statistics.
As the team lead, I am responsible for the overall team coordination. This involves providing a clear set of goals and directions for the team, overseeing the whole project and listening to teammates feedback for improvements. Furthermore, I am also in charge of Scheduling and Tracking, Deliverables and Deadlines. This involves defining, assigning, and tracking project tasks, ensuring that project deliverables is produced on time and in the right format.
As a developer, I am in charge of the UI component of this program. This involves understanding how UI is managed in this project and to ensure that the UI component of this project is well maintained.
See below for more details on my contributions for the duration of 10 weeks.
2. Summary of contributions
This section’s purpose is to summarise my contributions for the duration of this project. For more details about the contributions, click the link to the corresponding pull request.
-
Code contributed: My Codes
-
Major enhancement:
-
Added Patient Management feature (Main Enhancement)
-
What it does: This feature provide a centralised patient for the user to manage the clinic patients record.
-
Justification: This feature improves the product significantly because a user can make mistakes in commands and the app should provide a convenient way to rectify them.
-
Highlights: This enhancement is integrated alongside with queue, appointment and data commands to provide a cohesive system. It requires an in-depth understanding of ClinicIO’s architecture.
-
-
Added User Authentication feature
-
What it does: This feature allows the user to login to ClinicIO to gain access to ClinicIO record. Users can logout of ClinicIO to change account.
-
Justification: This feature provide more security to ensure that user has the appropriate rights to access the commands.
-
Highlights: This enhancement affects both existing commands and commands that would be added in the future. The implementation was challenging as all commands is relying on this feature to run the system more securely and efficiently.
-
-
-
Minor enhancement:
-
Other contributions:
-
Project management:
-
Setup organisation/team repo
-
Setup Travis CI, AppVeyor, Codacy and Coveralls
-
Setup project website with Netlify
-
Managed issue tracker
-
Managed project schedule tracking
-
Managed releases
v1.1,v1.2,v1.2.1,v1.3,v1.4(5 releases) on GitHub
-
-
Enhancements to existing features:
-
Documentation:
-
Tools:
-
Integrated a third party library (BCrypt) to the project
-
-
3. Contributions to the User Guide
Given below are sections I contributed to the User Guide. They showcase my ability to write documentation targeting end-users. |
User Authentication
ClinicIO’s User Authentication ensure that clinic staff are provided with correct access rights.
Here are the list of commands:
Login : login
You can login to ClinicIO.
Format: login r/ROLE n/NAME pass/PASSWORD
|
If you have already logged in, you cannot login again. |
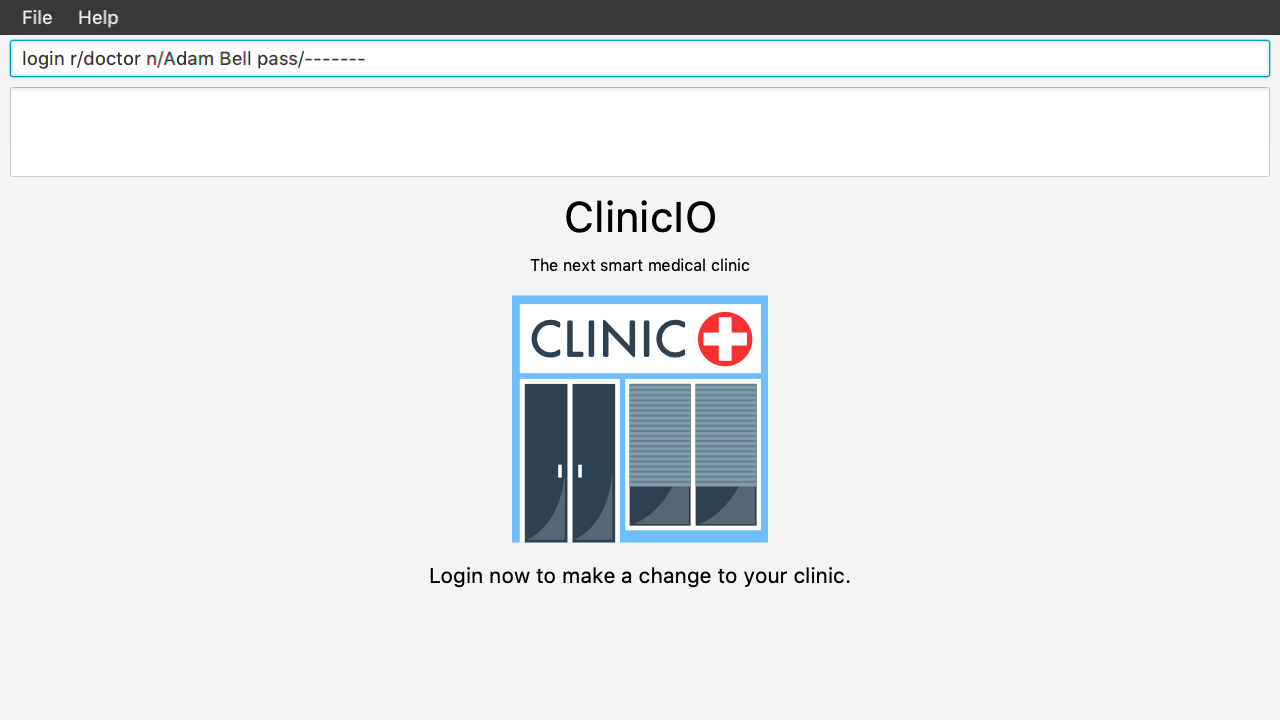
Prior to logging in to ClinicIO, the ClinicIO user status will show that you have not logged in yet (Shown as below):
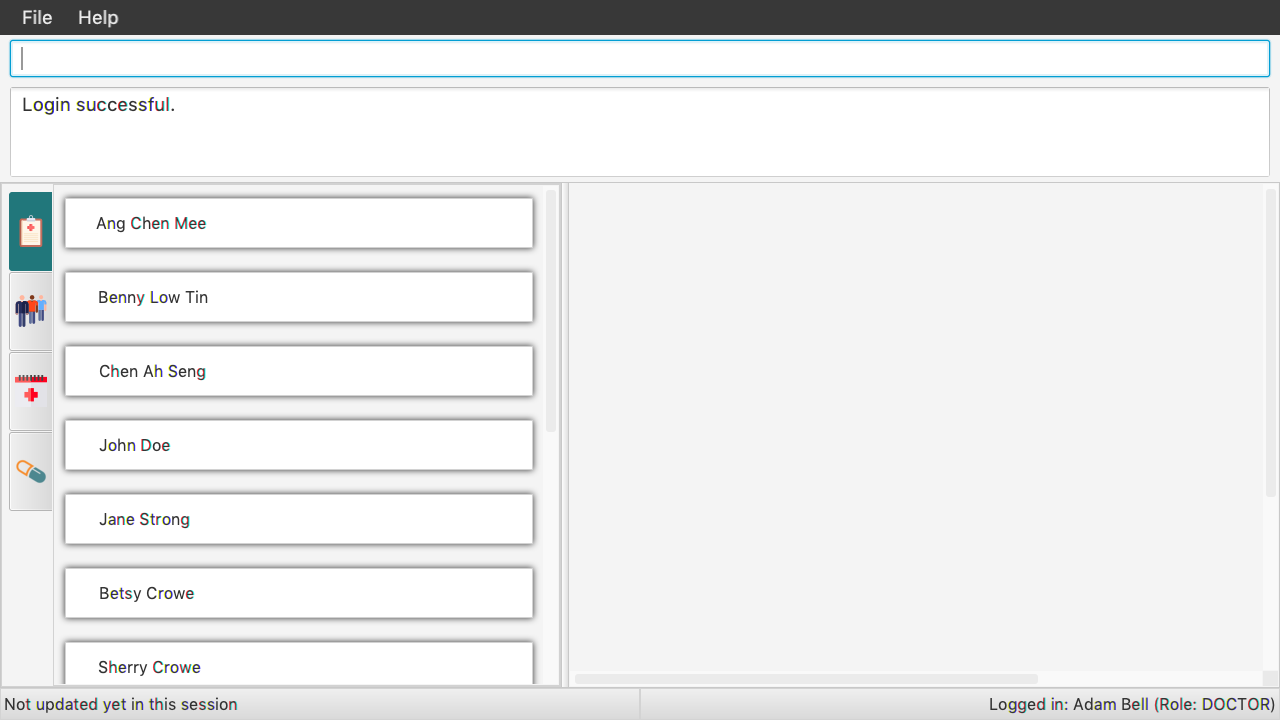
Once you have login successfully, the ClinicIO user status will be updated as below:
Examples:
-
login r/doctor n/Adam Bell pass/doctor1 -
login r/receptionist n/Mary Jane pass/reception3
Log out of the program : logout
|
You must log-in in order to use this feature. |
You can log out of ClinicIO.
Format: logout
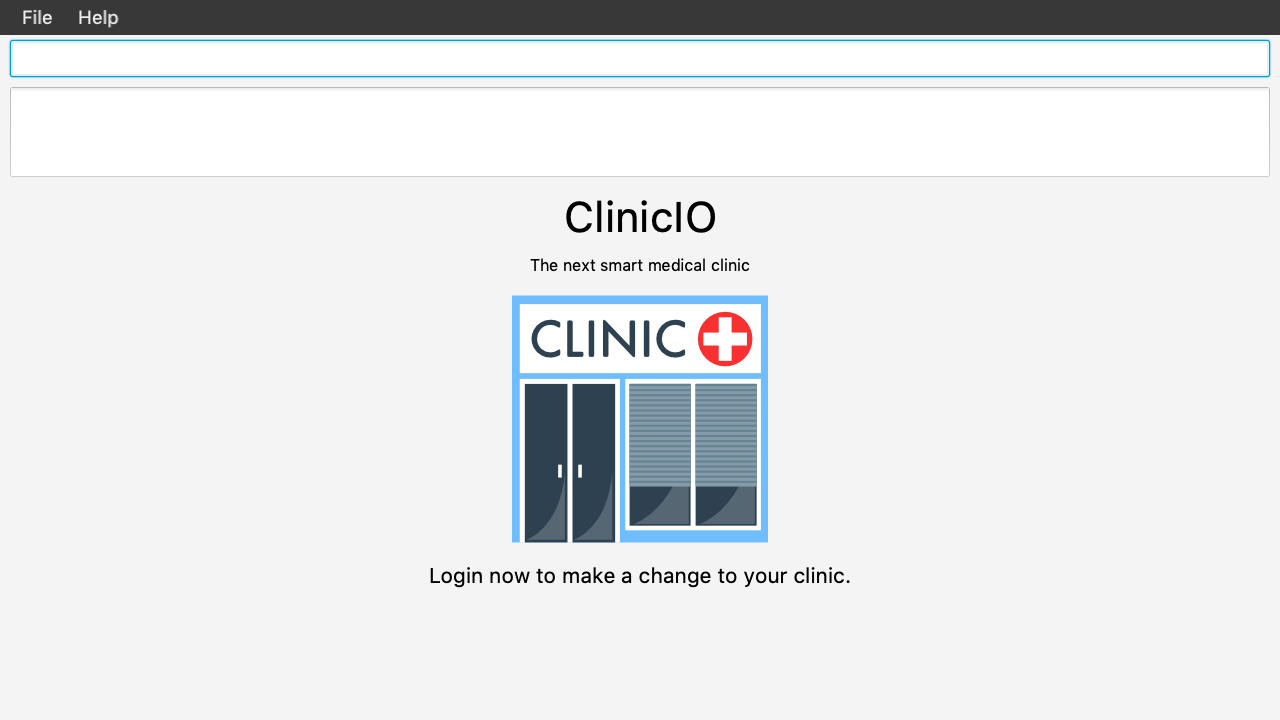
Once you entered the logout command, you will be redirected back to the startup page.
Patient Management
ClinicIO provides a centralised patient management system to allow you to manage the clinic’s patient record more efficiently.
Here are the list of commands:
Adding a patient: addpatient
|
You must log-in as a receptionist in order to use this feature. |
You can add a patient to the clinic record.
Format: addpatient n/NAME ic/NRIC p/PHONE_NUMBER e/EMAIL a/ADDRESS [medProb/MEDICAL_PROBLEMS]… [med/MEDICATIONS]… [alrg/ALLERGIES]… [preDr/PREFERRED_DOC]
You just need to type in the addpatient command as shown below:

Then, the new patient will be added to the list as shown below:
|
A patient can have any number of medical problems, medications, allergies (including 0) |
| A patient does not need to choose a preferred doctor. |
| You must choose a preferred doctor that exists inside ClinicIO record. |
Examples:
-
addpatient n/John Doe ic/S1234567D p/98765432 e/johnd@example.com a/John street, block 123, #01-01 alrg/Dairy Products -
addpatient n/Betsy Crowe ic/S2231414A e/betsycrowe@example.com a/Newgate Prison p/1234567 medProb/High Blood Pressure med/Chlorothiazide
Deleting a patient : deletepatient [coming in v2.0]
You can delete the specified patient from the clinic record.
Format: deletepatient INDEX
Examples:
-
list
deletepatient 2
Deletes the 2nd patient in the clinic record. -
find Betsy
deletepatient 1
Deletes the 1st patient in the results of thefindcommand.
Editing a patient : editpatient [coming in v2.0]
You can edit an existing patient in the clinic record.
Format: editpatient INDEX [n/NAME] [ic/NRIC] [p/PHONE_NUMBER] [e/EMAIL] [a/ADDRESS] [medProb/MEDICAL_PROBLEMS]… [med/MEDICATIONS]… [alrg/ALLERGIES]… [preDr/PREFERRED_DOC]
Examples:
-
editpatient 1 p/91234567 e/johndoe@example.com
Edits the phone number and email address of the 1st patient to be91234567andjohndoe@example.comrespectively. -
editpatient 2 n/Betsy Crower t/
Edits the name of the 2nd patient to beBetsy Crowerand clears all existing tags.
Locating patients by name: findpatient
You can find patients whose names contain any of the given keywords.
|
You must login in order to use this feature. |
Format: findpatient KEYWORD [MORE_KEYWORDS]
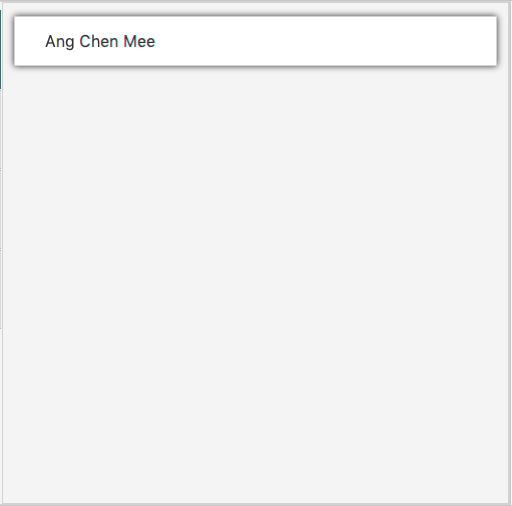
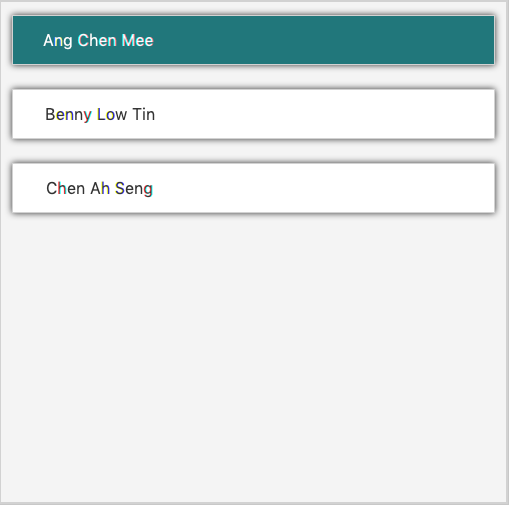
You just need to type in the findpatient command as shown below:

Then, any patient that matches the keywords will be displayed as shown below:
Examples:
-
findpatient John
ReturnsjohnandJohn Doe -
findpatient Betsy Tim John
Returns any patient having namesBetsy,Tim, orJohn
Listing all patients : listpatient
You can view a list of all patients in the clinic record.
|
You must login in order to use this feature. |
Format: listpatient
You just need to type in the listpatient command as shown below:

Then, all patients will be displayed as shown below:
Selecting a patient : selectpatient [coming in v2.0]
Selects the patient identified by the index number used in the displayed patient list.
Format: selectpatient INDEX
Examples:
-
list
selectpatient 2
Selects the 2nd patient in the clinic record. -
find Betsy
selectpatient 1
Selects the 1st patient in the results of thefindcommand.
4. Contributions to the Developer Guide
Given below are sections I contributed to the Developer Guide. They showcase my ability to write technical documentation and the technical depth of my contributions to the project. |
Patient Management feature
ClinicIO provides a centralised patient management system to allow you to manage the clinic’s patient record more efficiently. This patient management is the equivalent of Create, Read, Update and Delete (CRUD).
Current Implementation
The Patient Management feature contains multiple operations to indirectly manipulate the UniquePatientList. The implemented operations include:
-
addpatient: Add patient in ClinicIO. -
listpatient: Show all the patients in the ClinicIO record. -
findpatient: Find the patient from the patient list.
addpatient Command
The addpatient command behaves similarly to the add. The command takes in parameters that required to construct patients Nric.
The AddPatientCommandParser can parse command as usual despite not having a list of medical problems and medications, allergies and a preferred doctor.
Furthermore, addpatient command requires user to be login as a receptionist in order to add patient. If the preDr prefix is being specify, user must ensure
that the preferredDoctor exists inside the staff records.
Here is a step-by-step on how addpatient command execute:
Step 1: The user executes the addpatient command.
Step 2: The addpatient command calls UserSession#isLoginAsReceptionist() to ensure that user is logged in as a receptionist.
Step 3: Once the verfication has been made, the addpatient command call Model#hasPatient() to avoid duplicate patient being added.
Step 4: Once the verfication has been made, the addpatient command call Model#hasStaff() and preferredDoctor.getRole().equals(DOCTOR) to check if the preferred doctor is a doctor in ClinicIO.
Step 5: Once the verfication has been made, the addpatient command call Model#addPatient to add patient to the patient record.
Step 6: The addpatient command raises a SwitchTabEvent to notify ui to switch tabs.
Step 7: The addpatient command call Model#commitClinicIo() to finalise the changes made to the patient record.
Step 8: The addpatient command provide the success message to indicate that patient has been added to ClinicIO.
The following code snippet shows how addpatient Command is executed:
    @Override
    public CommandResult execute(Model model, CommandHistory history)
            throws CommandException {
        requireNonNull(model);

        if (!UserSession.isLoginAsReceptionist()) { (1)
            throw new CommandException(MESSAGE_NOT_LOGGED_IN_AS_RECEPTIONIST);
        } else if (model.hasPatient(toAdd)) { (2)
            throw new CommandException(MESSAGE_DUPLICATE_PATIENT);
        } else if ((toAdd.getPreferredDoctor().isPresent())
                && (!isPreferredDoctor(model, toAdd.getPreferredDoctor().get()))) { (3)
            throw new CommandException(MESSAGE_NO_DOCTOR_FOUND);
        }

        model.addPatient(toAdd); (4)
        model.switchTab(0);
        model.commitClinicIo();
        return new CommandResult(String.format(MESSAGE_SUCCESS, toAdd));    }
    }

    /**
     * Check if the staff is the preferred doctor.
     * @param model The current model in ClinicIO
     * @param preferredDoctor Patient's preferred doctor
     * @return True if the staff is a doctor found in ClinicIO.
     */
    public boolean isPreferredDoctor(Model model, Staff preferredDoctor) {
        requireNonNull(preferredDoctor);
        boolean hasStaff = model.hasStaff(preferredDoctor);
        boolean isDoctor = preferredDoctor.getRole().equals(DOCTOR);
        return hasStaff && isDoctor;
}| 1 | Check if user is login as receptionist. |
| 2 | Check if there is an existing patient record. |
| 3 | Check if the preferred doctor exist in the staff record. |
| 4 | Add patient to ClinicIO. |
listpatient Command
The listpatient Command retrieve all patients in the UniquePatientList by creating a FilteredAppointmentList and display all patients in the PatientListPanel.
Here is a step-by-step on how listpatient command execute:
Step 1: The user executes the listpatient command.
Step 2: The listpatient command calls UserSession#isLogin() to ensure that user is logged in.
Step 3: Once the verfication has been made, the listpatient command call Model#updateFilteredPatientList() to retrieve all patients found in UniqueStaffList.
Step 4: The listpatient command raises a SwitchTabEvent to notify ui to switch tabs.
findpatient Command
The findpatient Command find patient with the name as keywords using PatientNameContainsKeywordsPredicate.
Here is a step-by-step on how findpatient command execute:
Step 1: The user executes the findpatient command by specifying all the names to search.
Step 2: The findPatient command calls UserSession#isLogin() to ensure that user is logged in.
Step 3: Once the verfication has been made, the findpatient command call Model#updateFilteredPatientList() to retrieve all patients found in UniqueStaffList containing keywords in PatientNameContainsKeywordsPredicate.
Step 4: The findpatient command raises a SwitchTabEvent to notify ui to switch tabs.
The following sequence diagram shows how findpatient command works:
Logic
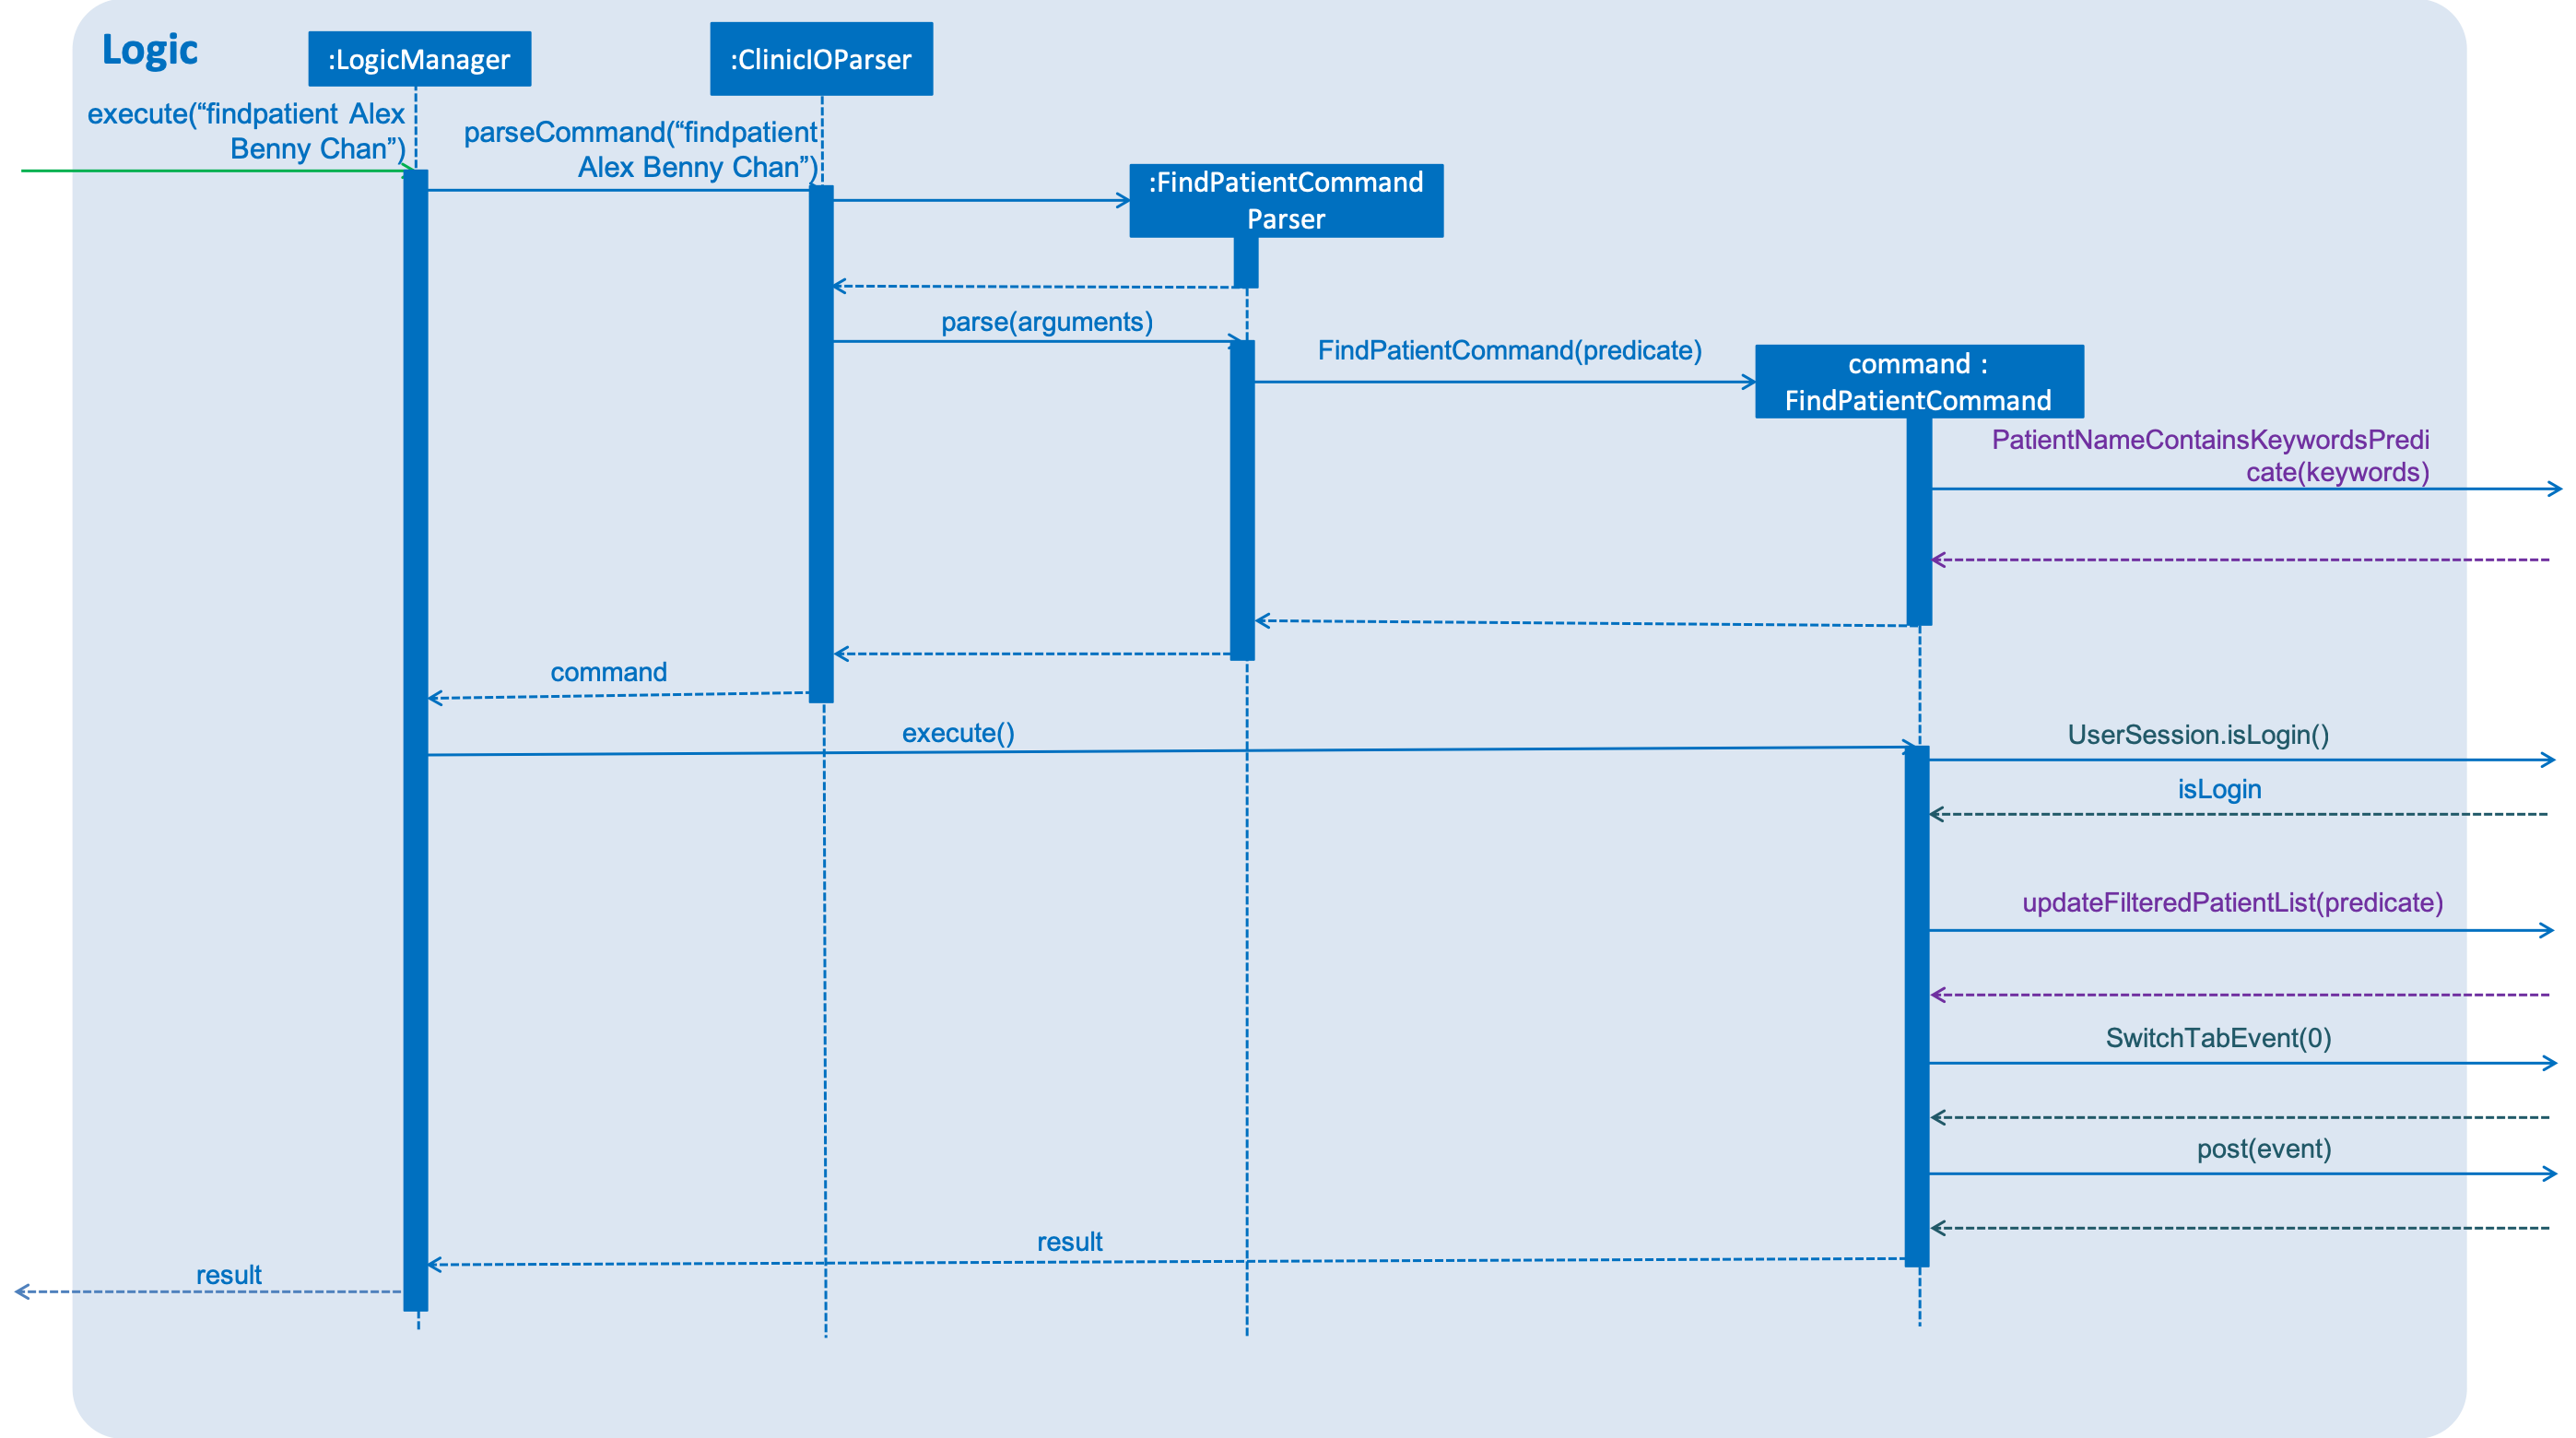
findpatient Command for the logic component.
Model
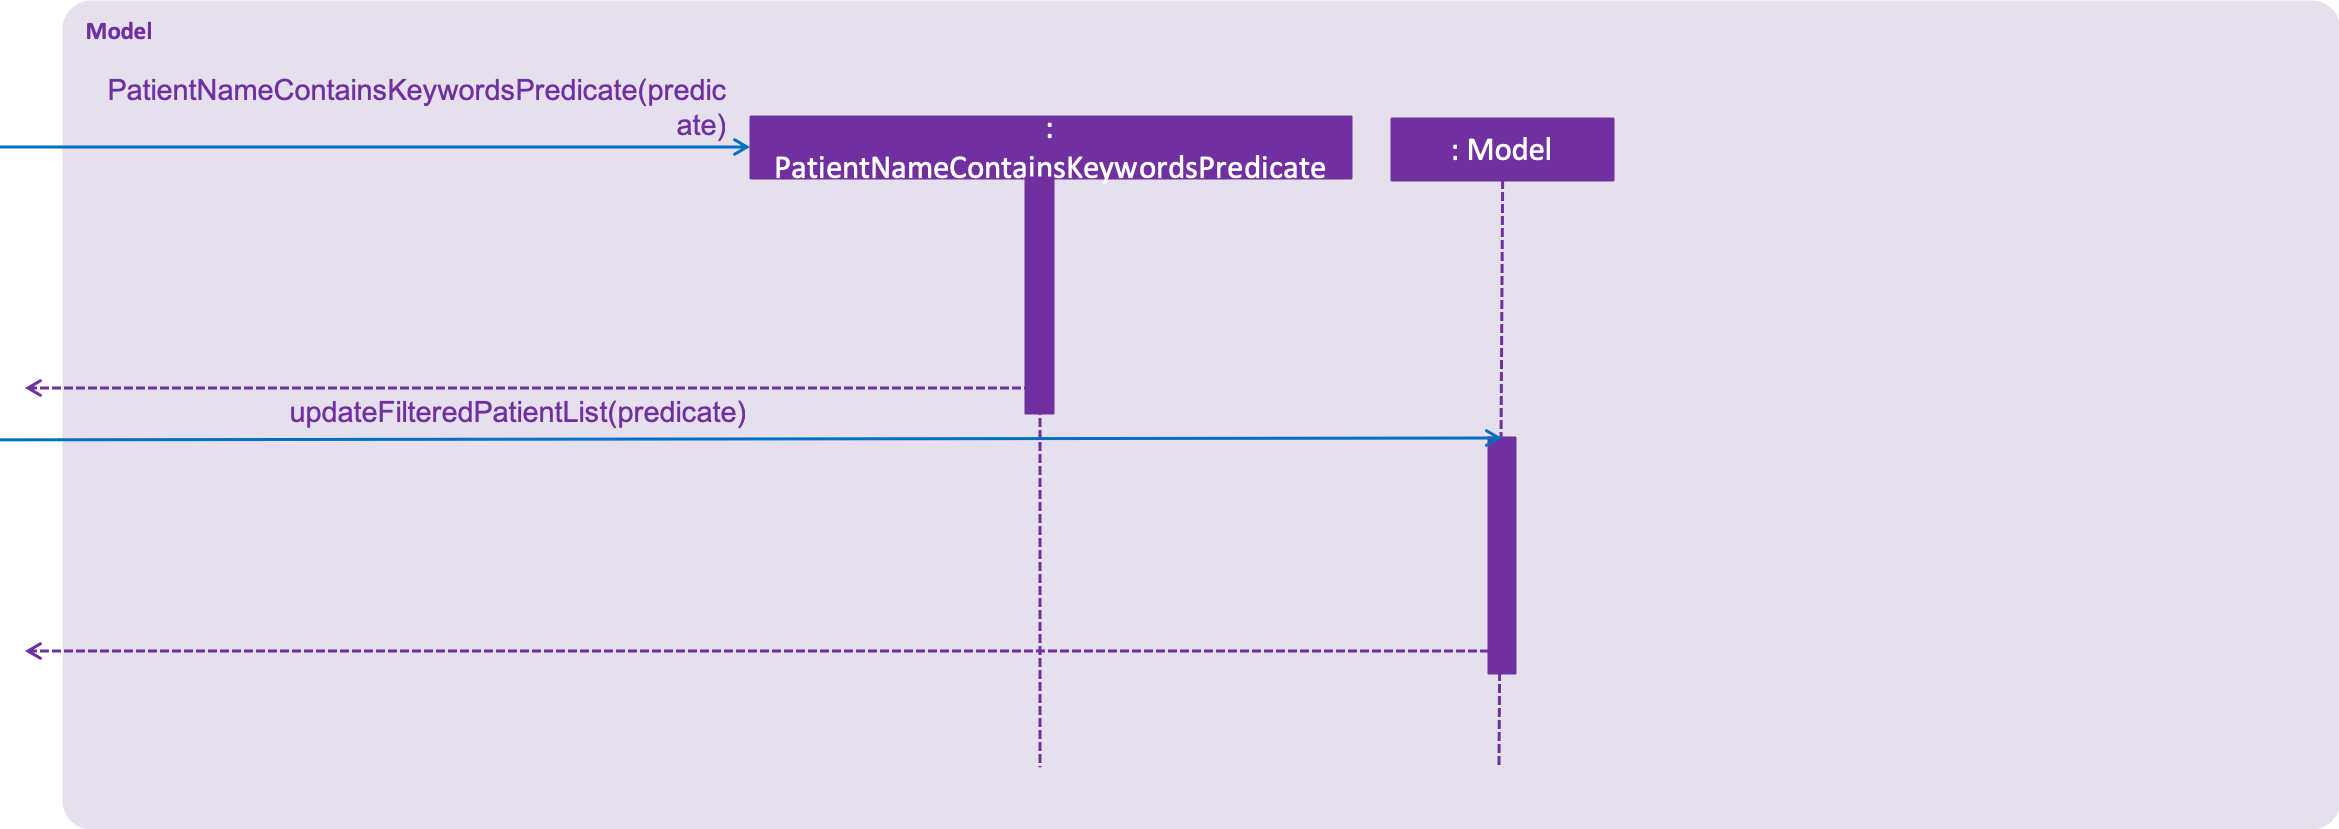
findpatient Command for the model component.
Commons
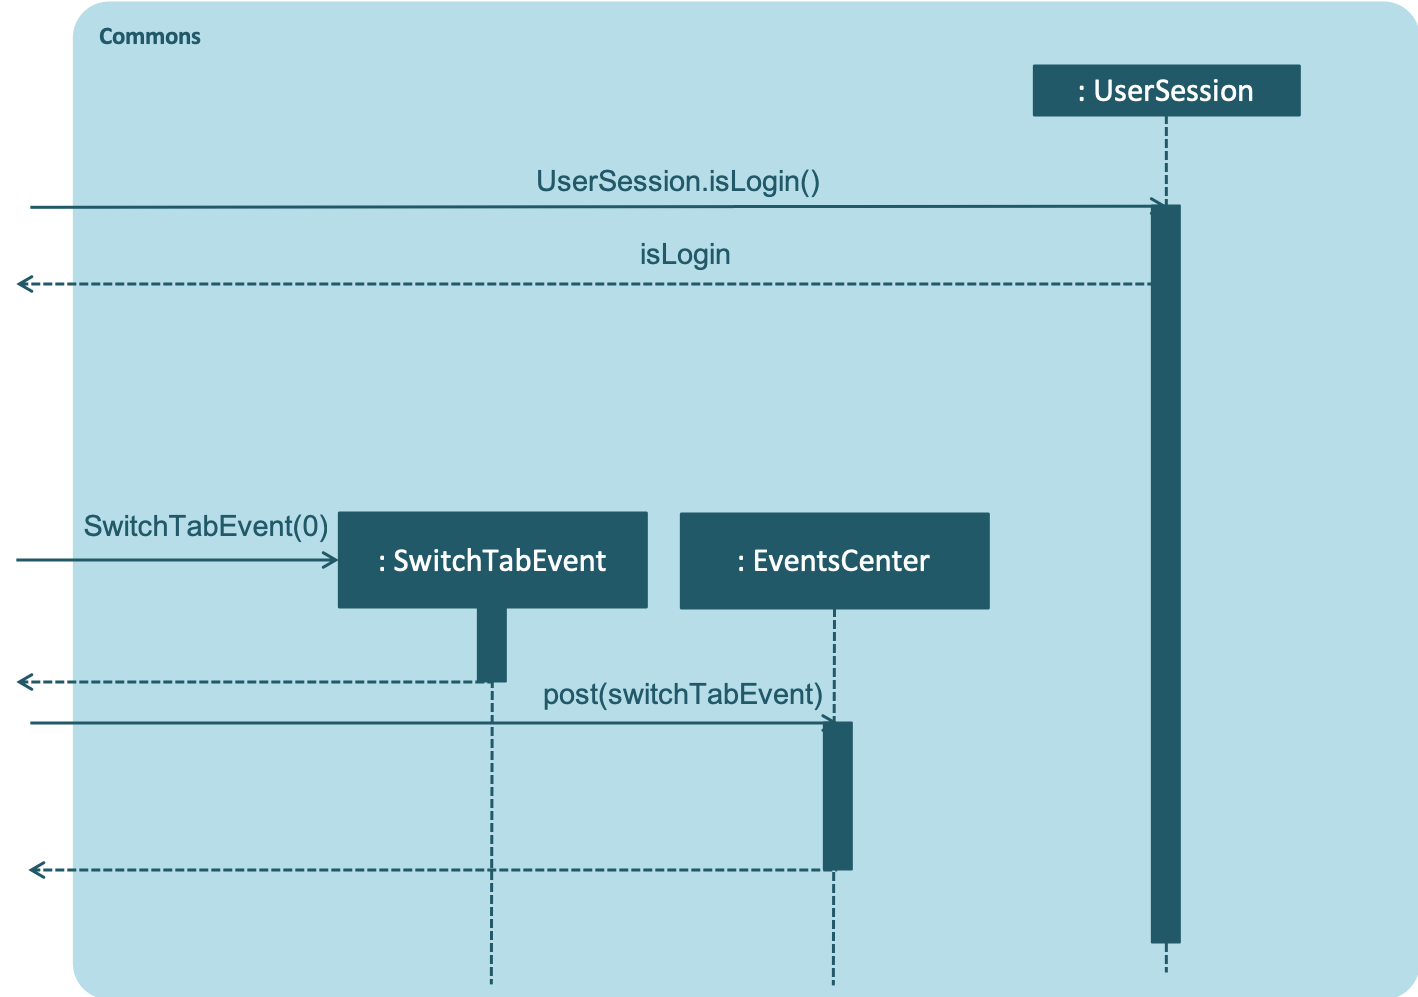
findpatient Command for the commons component.
Design Considerations
Aspect: Manipulate the list
There are various places to execute command. Here are some options:
-
Alternative 1 (current choice): Handle at the model component
-
Pros : Prevent logic from being heavy of data manipulaiton.
-
Cons : Too challenging to ensure all necessary methods are at the model.
-
-
Alternative 2: Handle at the logic component
-
Pros: Easy to implement by retrieving the
UniquePatientListto do manipulation of data -
Cons: Loses the purpose of having model and logic components. The logic will be loaded with codes while model will be light on codes.
-
User Authentication
ClinicIO ensures appropriate user access rights are issued by authenticating users at login.
Current Implementation
The User Authentication feature comprises of commands as below:
-
loginCommand: Allow users to login. -
logoutCommand: Allow users to logout.
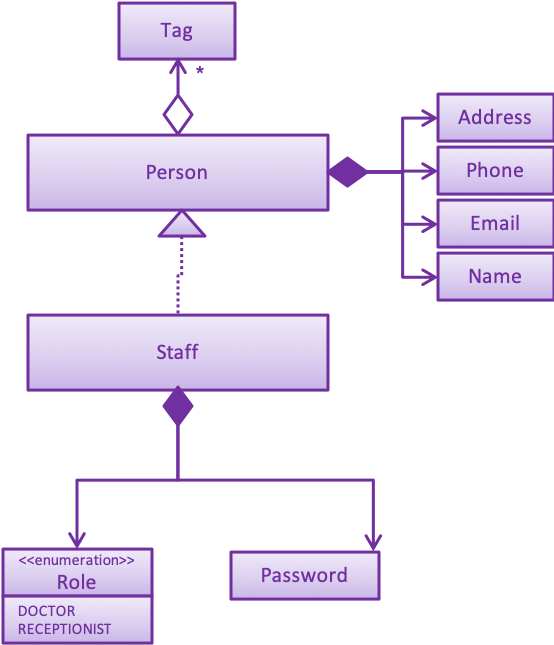
The following class diagram below illustrates the association between the Staff class and its associated class.
login Command
The login Command contains multiple operations to manipulate the UniqueStaffList indirectly.
The implemented operations include:
-
ClinicIo#hasStaff(): Check if the staff record exists inside ClinicIO
-
ClinicIo#getStaff(): Retrieve the staff record from the
UniqueStaffList -
Password#verifyPassword(): Check if password entered by user matches the staff record that was found in the
UniqueStaffList
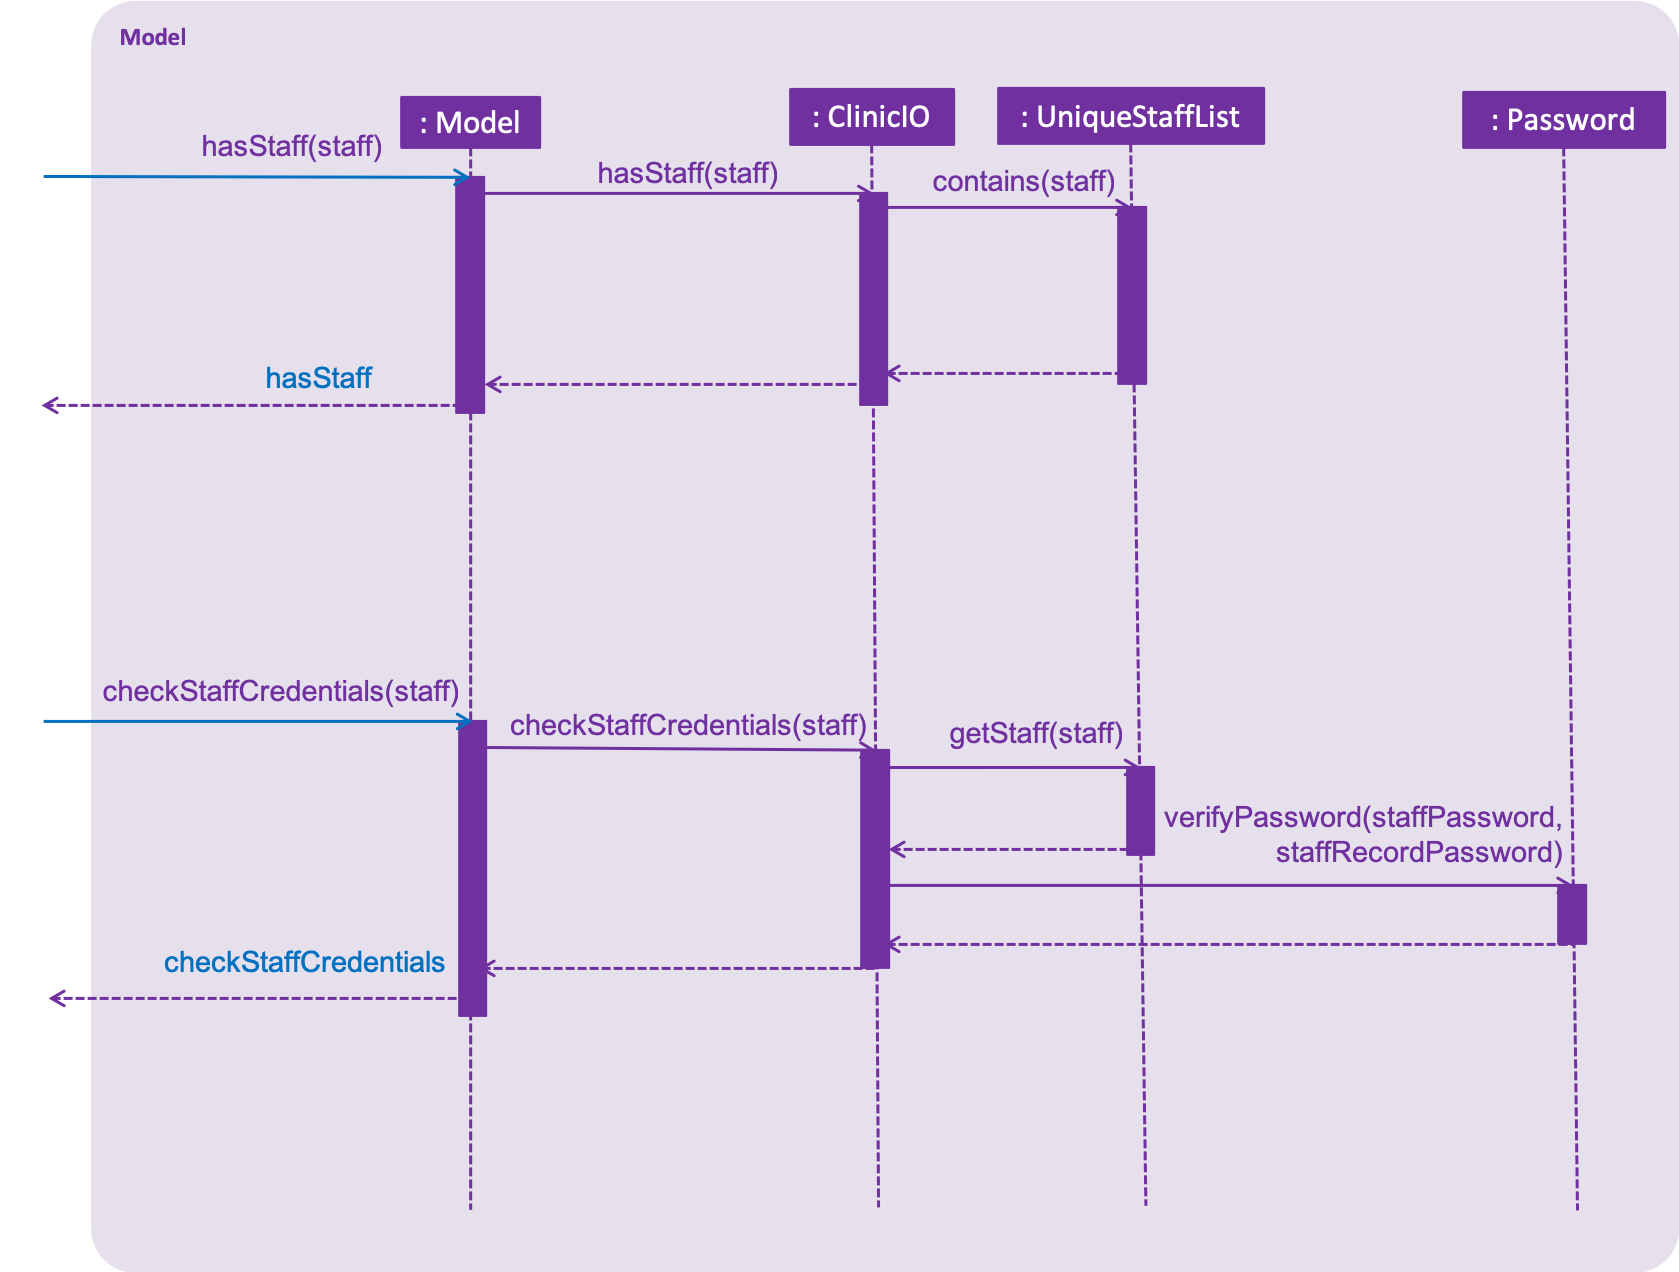
These operations are exposed in the Model interface as Model#checkStaffCredentials().
HashUtil is used to manage the encryption and verification of password.
These are operations inside HashUtil:
-
HashUtil#hashToString(): Hash the password
-
HashUtil#verifyPassword(): Check if the password matches the hashed password
Given below is a scenario to illustrate the login authentication at each step:
Step 1: The user executes the login command by specifying the role, name and password. The login command determines the type of role entered by the user.
Step 2: The login command calls Model#hasStaff() to ensure that this staff record exist inside ClinicIO.
Step 3: Once ClinicIO check if staff exists, the login command call Model#checkStaffCred() to retrieve the doctor found in UniqueStaffList.
Step 4: The login command verifies a password using HashUtil#verifyPassword() with the given doctor’s password and password entered by the user.
Step 5: To indicate successful completion of verification, the login command raises a LoginSuccessEvent.
The following sequence diagrams shows how the login works:
Logic

login Command for the logic component.
Model
login Command for the model component.
Commons
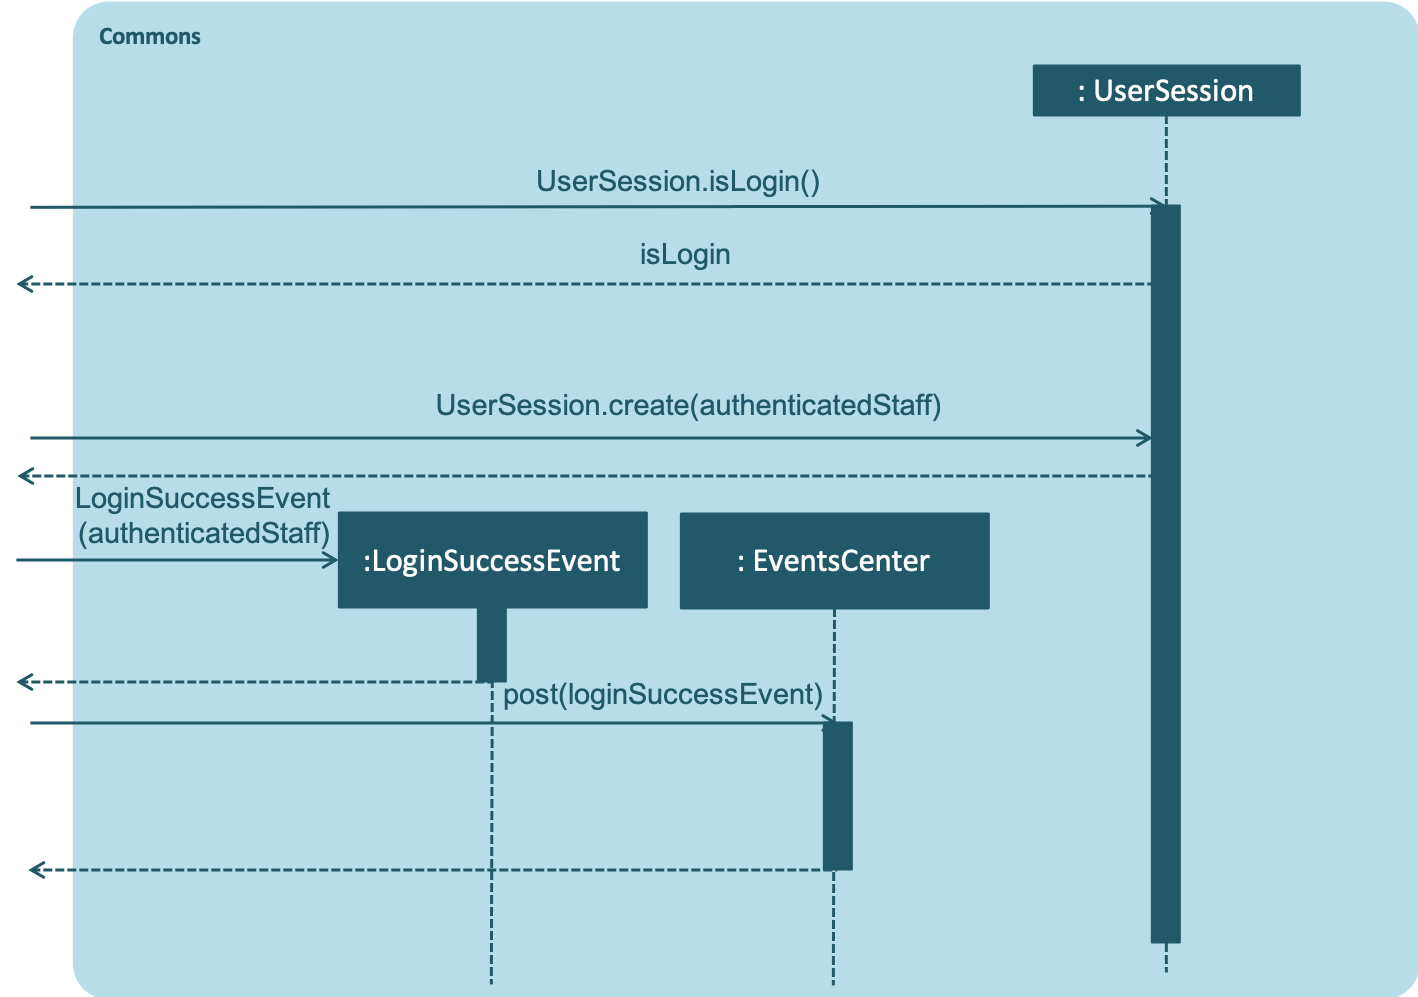
login Command for the commons component.
The following activity diagram summarizes what happens when a user executes LoginCommand:
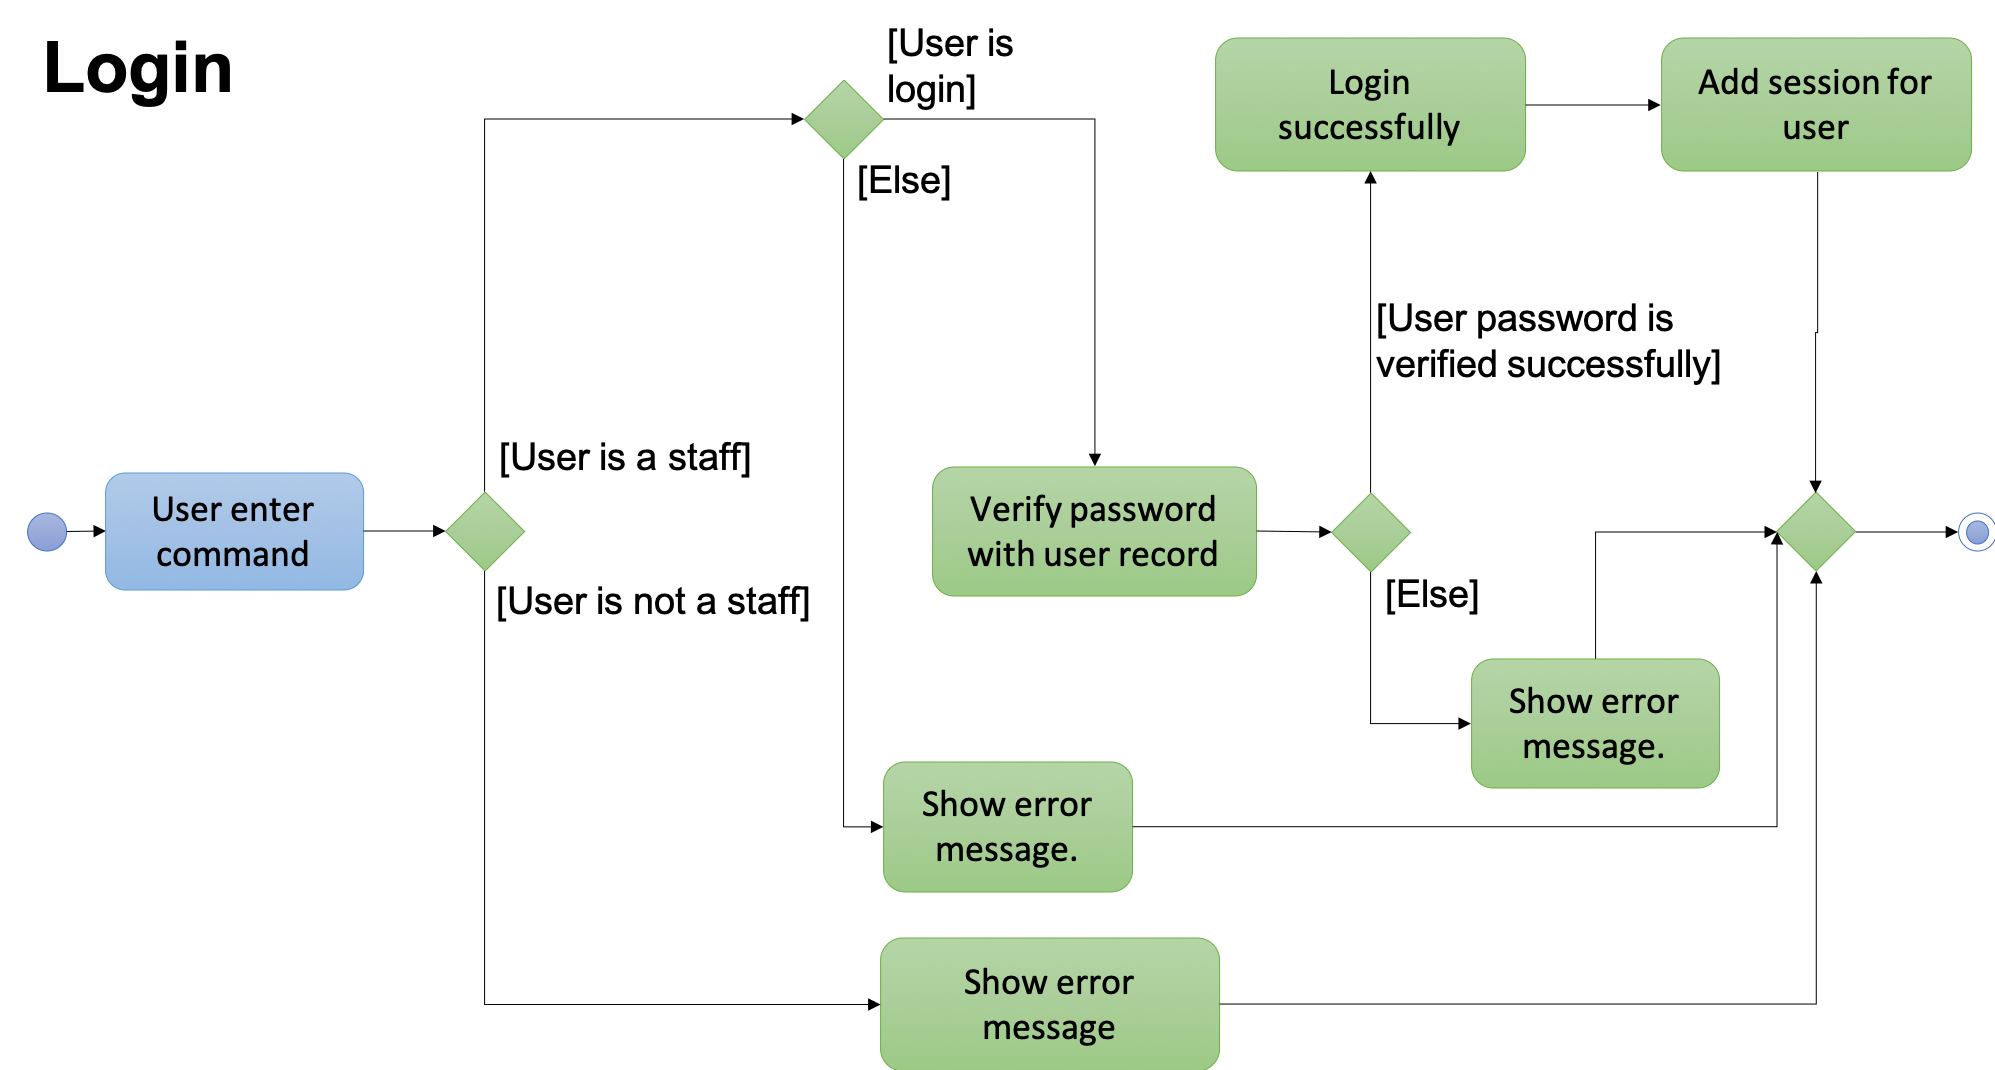
login Command
logout Command
The logout command post a LogoutClinicIoEvent to notify the UI that you want to log out of ClinicIO. It uses
the EventCenter to communicate between components without requiring the components to register with
each other explicitly.
Here is a step-by-step on how logout command notify MainWindow that you want to log out of ClinicIo:
Step 1: The logout command post a new LogoutClinicIoEvent to the EventsCenter.
Step 2: The eventBus post the newly created LogoutClinicIoEvent (from Step 1) to make the event available to any listeners in EventBus.
Step 3: ClinicIo will listen for handleLogoutClinicIoEvent() to receive the event and update the user session status.
Design Considerations
Aspect: Retrieval of password
-
Alternative 1 (current choice): Create a
PasswordPrefixFormatterto handleCommandBoxwhenever user type 'pass/' prefix.-
Pros: More secure for being able to mask password.
-
Cons: Complex as it will require certain manipulation of the password in order to mask password.
-
-
Alternative 2: Open an additional alert window to prompt the user for a password.
-
Pros: Greater security as the entire password will be censored.
-
Cons: Require a new window to be opened. This will consume time depending on the system. In addition, this will detract from the user experience due to the shift in focus required.
-
Aspect: Keep track of user session
-
Alternative 1 (current choice): Have a
UserSessionclass to handle user session-
Pros : Allow developers to handle user session easily.
-
Cons : Too troublesome as user will to login to ClinicIO at every startup.
-
-
Alternative 2: Save user session state in a file.
-
Pros: More convenience for users as they does not need to login on every startup.
-
Cons: Less secure as users, who understand how ClinicIO works, could edit the role of the user to have unauthorised access to ClinicIO.
-